How To Set Up A Private Chat Server For Your Guild | 15 Essential Steps For Success
A private chat server puts all conversation in one place so officers can schedule events and members can share tactics even when the game is off. Setting one up may seem hard because of hosting, permissions and voice rooms, but clear steps make it simple.
You can use ready-made apps like Discord or run your own with Rocket.Chat or Mattermost for more control. Pick the option that matches your group size, comfort with tech, and need for privacy.
1. Choose Your Chat Platform Based On Guild Needs
Pick a platform that fits how your group likes to talk and play. Discord is the most common choice for gaming groups. It is easy to use, has many features and works well for groups who meet often and want a mix of chat, voice, and events.
If you want full control of your data, self-hosted options like Rocket.Chat or Mattermost let you run everything on your own servers. Rocket.Chat can take a bit more learning, while Mattermost feels familiar if you have used Slack.
Element, built on Matrix, focuses on privacy and strong encryption and can link to other Matrix servers. For groups that mostly need low-latency voice, classic tools like TeamSpeak and Mumble still give the best call quality and stability for serious play.
2. Create Your Discord Server Fast
A Discord space can hold a huge number of members, so it will not outgrow you. To make a server, sign in to Discord, click the plus (+) on the left, choose Create a Server, pick a template or start fresh, give it a name, and add an icon.
The setup guide will help with basic settings and offer tips for growing a Discord server.. You can start a new server or change an existing one into a Guild if that option appears in your app.
Templates are a big time saver if you want ready-made channels and roles. Pick a name, icon, and first channels that match your group’s tone, casual, competitive or roleplay, so new people get the right impression.
3. Design An Easy-to-Use Channel Layout

Organize rooms so people find what they need without scrolling. Start with a welcome area that holds rules, announcements, and member introductions. Keep general chat and off-topic rooms near the top.
Add a set of text rooms for different game modes, teams, or topics, for example raids, PvP, crafting and class strategy. Put leader or officer discussions in a private area with restricted access.
For voice, have a lobby for hangouts and separate voice rooms for groups or squads that play together. Use category permissions to control who sees or can post in each area. Name rooms clearly, like raid-strategy or gear-help, and add short descriptions so newcomers know what each room is for.
4. Establish Guild Roles And Hierarchy
Use roles to give people clear duties and show their place in the group. Role colors help you spot leaders and trusted members at a glance. Every server starts with the @everyone rol, set its basic rights first, then add other positions on top of it.
Common positions are Guild Master (full control), Officers (management), Core Raiders (trusted team), Raiders (active members), Recruits (new members) and Social (casual players).
Make positions that match how your group actually works, not an idealized chart. The order of positions matters, higher ranks can manage lower ones, not the other way around. Pick colors so important people stand out in member lists. Add game-specific tags for classes or regions to help people find teammates quickly.
5. Configure Permissions With Security In Mind
Permissions control what people can do. Administrator gives every right and ignores channel limits, so give it only to the Guild Master and a single trusted backup. Basic community permissions include viewing channels, sending messages, creating threads and posting in threads.
These usually go to @everyone unless you need tighter control. Give message and thread management to officers who actually need it. Kicking removes someone temporarily; banning removes them permanently.
The Manage Roles permission lets a user make or edit positions below their rank and only pass on rights they already have. Use channel settings to change or override server-wide rules for specific rooms.
6. Set Up Role-only Channels For Officers
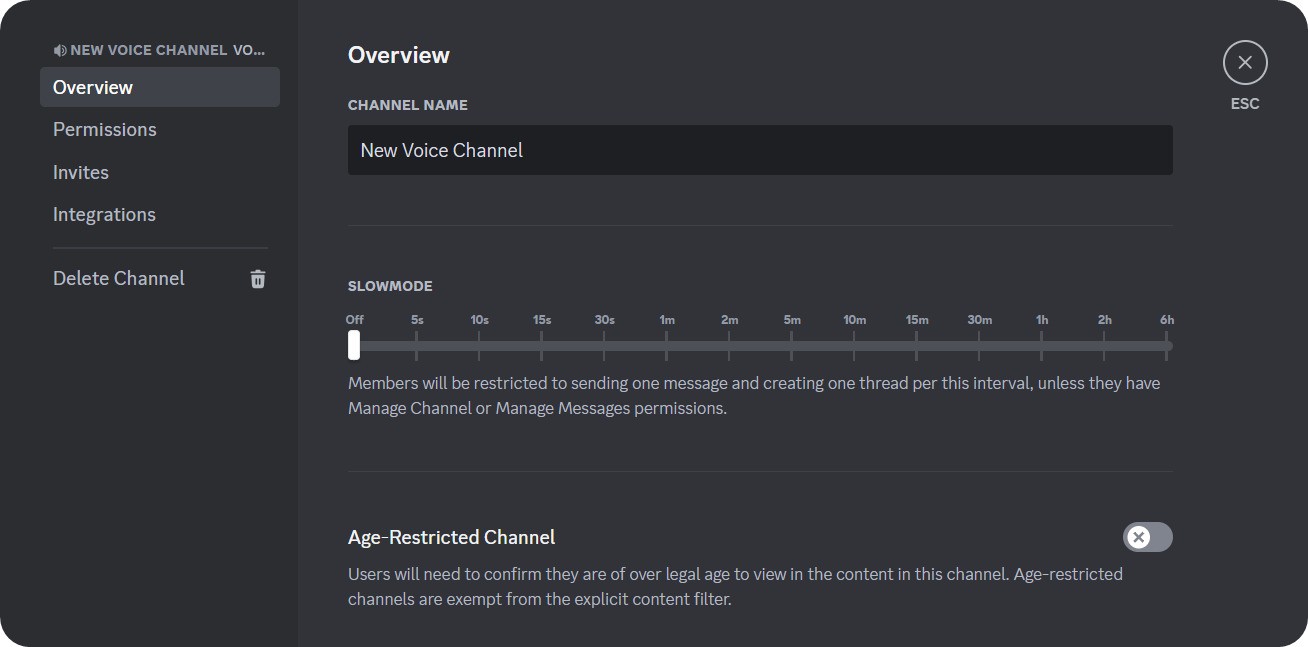
Create private officer channels before handing out leadership positions. Click the plus next to a category or channel list, choose Create Channel, give it a clear name, and turn on Private Channel.
Then pick which ranks can enter, typically the Guild Master and officers. When you do this, @everyone loses read access and the chosen ranks gain it automatically. Make separate rooms for daily officer chat, private voice calls, leadership-only talks, recruit applications and event planning.
To hide voice channels entirely, deny View Channel for @everyone, not just Connect. Use hidden rooms sparingly to avoid gossip; most decisions can happen in public spaces.
7. Configure Voice Channels For Raids And Teams
Use voice rooms so players can talk in real time and coordinate during fights. Set up a clear hierarchy, a Main Hall for everyone, separate Squad rooms like Alpha, Bravo, Charlie for smaller teams, an AFK room for idle users, and an Officer room for private leadership talks.
Limit the number of users in squad rooms to match your group size. For example, make dungeon rooms for five players if your runs use five people. Leave social spaces and the Main Hall open to everyone. Give leaders permissions they need, such as a temporary louder voice, mute, and deafen controls so they can manage noise during key moments.
Adjust the audio bitrate to match your server boost level and what members’ internet can handle higher bitrate sounds clearer but uses more bandwidth . Turn on video for channels used for streaming, screen sharing, training sessions, or officer meetings.
8. Implement An Onboarding System For New Members
A simple onboarding process helps new members join smoothly and reduces repeat questions for officers. Use Discord’s onboarding tool to guide people through reading the rules, picking roles and finding important channels before they unlock the rest of the server.
Put a rules channel at the top of the list that explains expectations, behaviour standards, and consequences. Pin key messages and split the rules into clear sections with short headings and plain language. Add an introductions room where new members post their background, game experience and what they want from the guild.
This makes it easier for officers to judge fit and for members to welcome newcomers. Create a table of contents or guide channel that lists each room and important links like your StartPlaying page, server invite and socials. Use bots like MEE6 or YAGPDB to send welcome messages, assign starter roles and offer reaction menus.
9. Deploy Self-Hosted Solutions For Maximum Privacy

If privacy matters, running your own communication server is worth the effort. Start by getting a Linux server or an affordable VPS from providers such as DigitalOcean, Linode, or AWS; entry-level droplets often cost around five to ten dollars per month.
Both Rocket.Chat and Mattermost support Docker, which makes installation easier, install Docker, pull the app image, set environment variables, and launch the service. Many setups finish within an hour.
Rocket.Chat offers end-to-end encryption for stronger message privacy, while Mattermost encrypts data in transit and at rest. Pick Rocket.Chat when security is top priority and Mattermost when you want lighter resource use or easier integration. Rocket.Chat runs on MongoDB.
10. Install And Configure TeamSpeak For Voice Excellence
Setting up a voice server is similar across apps, download the server package, install it on Windows or Linux, and edit the configuration file or use the admin GUI to set the server name, authentication rules, audio limits and network port.
If you use Mumble instead, run Murmur, which ships with the Mumble installer. During setup, create a strong SuperUser password to stop unauthorized access. Enable both voice and text so players with poor mics or slow connections can still follow instructions.
TeamSpeak also lets each user adjust incoming volume for others so quiet speakers can be heard without changing anyone’s microphone. Join anonymous chat rooms with no registration at chat coffee. Design your room layout to match guild needs, a main lobby, officer room, raid rooms, squad rooms, and an AFK room.
11. Set Up Mumble For Gaming Communication

Mumble is a free, open-source voice app that gives clear audio with very little delay. People use it for podcasts, large game communities, and competitive play. The Murmur server runs on Windows and Linux and installs from a single Mumble package that includes both client and server.
Run the server setup, set a port and maximum users, then start the service. Mumble runs well on low-power hardware like a Raspberry Pi, so you do not need an expensive host. A small VPS or a home machine will work for most groups.
Turn on the in-game overlay to see who is in a channel or who is speaking. You can disable the overlay entirely or for specific games in Settings → Overlay. Encryption is on by default, control traffic uses TLS 256-bit AES-SHA and voice uses OCB-AES 128-bit.
12. Integrate Bots For Automation And Moderation
Bots add automation, moderation, and handy tools to your Discord or self-hosted chat. MEE6 and YAGPDB can handle moderation, welcome messages, role assignment and activity rewards.
They can mute spammers, remove bad content, warn rule-breakers, and assign roles based on activity. YAGPDB also offers a support ticket feature that creates a visible help role so members can request private help.
Dyno provides custom commands, announcements, auto-moderation, and music features. Create commands that answer common questions, post calendar reminders, or link to raid signups and guides. Game-specific bots like Raid-Helper, Sesh, and WoWAnalyzer help with event scheduling, RSVPs and raid logs.
13. Establish Communication Guidelines And Etiquette

Set clear rules to keep chat friendly and efficient. Write rules about acceptable content, respect, language, voice behavior and consequences for breaking rules. Put them in a channel new members must read and confirm before accessing the rest of the server.
Define voice etiquette for coordinated play. State when to use push-to-talk or voice activation, what background sounds are acceptable, if music is allowed and when people should avoid talking over leaders.
Mark channels for casual chat and others for focused gameplay. Use role mentions carefully. Save @everyone and @here for urgent messages only so people do not learn to ignore alerts. Targeted mentions like @Raiders or @Officers reach the right group. Set response expectations for applications and reports.
14. Back Up Your Server Configuration And Data
Losing chat history, role setups or bot settings is painful. Discord has limited backup tools, but server templates save channel layout, roles and permissions for quick rebuilding. Create templates before big changes.
Save important content manually, pin key messages, download images and documents, and keep copies of rules and guides in external storage such as Google Drive or Dropbox. If you self-host with Rocket.Chat or Mattermost, use Docker and back up volumes or run database dumps.
Schedule automated backups for databases and app files, keep copies locally and in cloud storage and test restores regularly so backups are actually useful. Back up bot settings separately. Some bots store data off-site, but custom commands and permission setups need documentation.
15. Monitor, Moderate And Maintain Your Server

Opening the server is only the start. Use verification tools like phone checks to block bots, but balance security with ease of access since some members may not want to provide numbers.
Watch server health with activity metrics. Spot quiet channels that should be archived, fix permission gaps, and catch issues before they grow. Many platforms show message counts, voice use, and member trends. Moderate fairly and consistently.
Ask members for feedback through polls and surveys so you can improve organization and tools. Adapt the layout as the group grows; channels that work for 20 people break with 200. Archive old content, split busy channels and update permissions when needed.
Essential Features Every Guild Chat Server Needs
Dedicated Channel Structure For Different Communication Types
Keep separate spaces for each type of conversation so members can find things fast. Text channels should have clear roles, announcements for major guild news only, general for casual talk, game-strategy for tactics, questions for help, and off-topic for non-game chat.
Label channels so people know where to post. Voice channels should match that order, a main hall for casual voice, raid channels for planned fights, squad channels for small groups, officer voice for leadership, and an AFK channel for idle users. Use automatic AFK moves to keep active channels tidy.
Role Based Access Control And Permissions
Use precise permissions to avoid security problems while giving trusted members the tools they need. Public channels are open to everyone for general chat, questions, and community building.
Avoid too many private channels since that can feel exclusive. Member-only channels should be for full members, not guests. Use them for private strategy, honest feedback, and internal planning.
Integration With External Tools And Platforms
Link your chat server with other platforms to keep things connected. Add Discord widgets to your website, sync accounts, and post announcements in both places to keep branding consistent.
Sync calendars so events appear everywhere. Tools like Raid-Helper or Sesh link to Google Calendar, send reminders, collect RSVPs, and alert members before events. Use game-specific tools for in-game data.
For example, add Warcraftlogs for combat analysis or zkillboard for kill tracking. Enable Rich Presence to show what members are playing. Create a gear-talk channel where members post build guides, share deals and discuss topics like cheapest 4k gaming setups.
Mobile Access For On-the-go Communication
Make sure members can stay involved from phones. Discord mobile supports most features, text, voice, role controls, and some admin tools. Officers can handle urgent issues on the go.
Self-hosted options also offer mobile apps. Rocket.Chat and Mattermost both have mobile clients with push notifications and many desktop features. TeamSpeak has a paid iOS client. Mumble works via third-party apps once set up. Pick platforms with strong mobile support if many members travel.
Security Features And Privacy Controls
Protect the server from outside attacks and internal problems. Require two-factor authentication for server owners and officer roles. Lock sensitive functions behind extra checks and audit elevated accounts often.
Keep security logs to spot odd behavior like strange logins, mass message deletions, or sudden role changes. Track IPs if needed to investigate abuse. Decide how to handle private message reports.
Make a clear process for reporting harassment that starts in direct messages and make sure officers know how to respond. Set content logging and retention rules. Some groups log everything for dispute resolution, others keep less data to protect privacy.
FAQs About Guild Chat Servers
Which Platform Is Best For A New Gaming Guild Just Starting Out?
Discord is the easiest choice for most new guilds. It is free, simple to set up, and many gamers already use it.
How Do I Prevent Spam And Trolls In My Guild Chat Server?
Use several layers of protection. Require email verification and consider optional phone checks.
Should I Use Discord Or Set Up A Self-hosted Server For My Guild?
Discord covers most needs and lets you focus on community. Choose a self-hosted platform only if you need full control over data, special features not available on Discord.
How Many Channels Should I Create For My Guild Server?
New guilds often do well with about eight to twelve channels like rules, announcements, general chat, strategy, voice rooms and an officer space.
What Permissions Should Officers Have Versus Regular Guild Members?
Officers need powers to keep the server running, manage messages, kick or ban users, create and edit channels, set roles and manage integrations.
How Much Does It Really Cost To Build A Chatbot?
A typical chatbot project can cost between $40,000 and $150,000. The final price depends on how complex the bot is and which features you want.
Final Thoughts
A good chat server turns scattered chats into a smooth hub for raids, strategy and daily hangouts. Start small, lock down the basics and add features only when the group needs them.
Keep rules clear, back up important data and ask members for feedback as you grow. Do that and your guild will spend less time managing tools and more time playing together.
Also Check Out: The Role Of Games In Developing Problem-solving Skills
You can use ready-made apps like Discord or run your own with Rocket.Chat or Mattermost for more control. Pick the option that matches your group size, comfort with tech, and need for privacy.
1. Choose Your Chat Platform Based On Guild Needs
Pick a platform that fits how your group likes to talk and play. Discord is the most common choice for gaming groups. It is easy to use, has many features and works well for groups who meet often and want a mix of chat, voice, and events.
If you want full control of your data, self-hosted options like Rocket.Chat or Mattermost let you run everything on your own servers. Rocket.Chat can take a bit more learning, while Mattermost feels familiar if you have used Slack.
Element, built on Matrix, focuses on privacy and strong encryption and can link to other Matrix servers. For groups that mostly need low-latency voice, classic tools like TeamSpeak and Mumble still give the best call quality and stability for serious play.
2. Create Your Discord Server Fast
A Discord space can hold a huge number of members, so it will not outgrow you. To make a server, sign in to Discord, click the plus (+) on the left, choose Create a Server, pick a template or start fresh, give it a name, and add an icon.
The setup guide will help with basic settings and offer tips for growing a Discord server.. You can start a new server or change an existing one into a Guild if that option appears in your app.
Templates are a big time saver if you want ready-made channels and roles. Pick a name, icon, and first channels that match your group’s tone, casual, competitive or roleplay, so new people get the right impression.
3. Design An Easy-to-Use Channel Layout
Organize rooms so people find what they need without scrolling. Start with a welcome area that holds rules, announcements, and member introductions. Keep general chat and off-topic rooms near the top.
Add a set of text rooms for different game modes, teams, or topics, for example raids, PvP, crafting and class strategy. Put leader or officer discussions in a private area with restricted access.
For voice, have a lobby for hangouts and separate voice rooms for groups or squads that play together. Use category permissions to control who sees or can post in each area. Name rooms clearly, like raid-strategy or gear-help, and add short descriptions so newcomers know what each room is for.
4. Establish Guild Roles And Hierarchy
Use roles to give people clear duties and show their place in the group. Role colors help you spot leaders and trusted members at a glance. Every server starts with the @everyone rol, set its basic rights first, then add other positions on top of it.
Common positions are Guild Master (full control), Officers (management), Core Raiders (trusted team), Raiders (active members), Recruits (new members) and Social (casual players).
Make positions that match how your group actually works, not an idealized chart. The order of positions matters, higher ranks can manage lower ones, not the other way around. Pick colors so important people stand out in member lists. Add game-specific tags for classes or regions to help people find teammates quickly.
5. Configure Permissions With Security In Mind
Permissions control what people can do. Administrator gives every right and ignores channel limits, so give it only to the Guild Master and a single trusted backup. Basic community permissions include viewing channels, sending messages, creating threads and posting in threads.
These usually go to @everyone unless you need tighter control. Give message and thread management to officers who actually need it. Kicking removes someone temporarily; banning removes them permanently.
The Manage Roles permission lets a user make or edit positions below their rank and only pass on rights they already have. Use channel settings to change or override server-wide rules for specific rooms.
6. Set Up Role-only Channels For Officers
Create private officer channels before handing out leadership positions. Click the plus next to a category or channel list, choose Create Channel, give it a clear name, and turn on Private Channel.
Then pick which ranks can enter, typically the Guild Master and officers. When you do this, @everyone loses read access and the chosen ranks gain it automatically. Make separate rooms for daily officer chat, private voice calls, leadership-only talks, recruit applications and event planning.
To hide voice channels entirely, deny View Channel for @everyone, not just Connect. Use hidden rooms sparingly to avoid gossip; most decisions can happen in public spaces.
7. Configure Voice Channels For Raids And Teams
Use voice rooms so players can talk in real time and coordinate during fights. Set up a clear hierarchy, a Main Hall for everyone, separate Squad rooms like Alpha, Bravo, Charlie for smaller teams, an AFK room for idle users, and an Officer room for private leadership talks.
Limit the number of users in squad rooms to match your group size. For example, make dungeon rooms for five players if your runs use five people. Leave social spaces and the Main Hall open to everyone. Give leaders permissions they need, such as a temporary louder voice, mute, and deafen controls so they can manage noise during key moments.
Adjust the audio bitrate to match your server boost level and what members’ internet can handle higher bitrate sounds clearer but uses more bandwidth . Turn on video for channels used for streaming, screen sharing, training sessions, or officer meetings.
8. Implement An Onboarding System For New Members
A simple onboarding process helps new members join smoothly and reduces repeat questions for officers. Use Discord’s onboarding tool to guide people through reading the rules, picking roles and finding important channels before they unlock the rest of the server.
Put a rules channel at the top of the list that explains expectations, behaviour standards, and consequences. Pin key messages and split the rules into clear sections with short headings and plain language. Add an introductions room where new members post their background, game experience and what they want from the guild.
This makes it easier for officers to judge fit and for members to welcome newcomers. Create a table of contents or guide channel that lists each room and important links like your StartPlaying page, server invite and socials. Use bots like MEE6 or YAGPDB to send welcome messages, assign starter roles and offer reaction menus.
9. Deploy Self-Hosted Solutions For Maximum Privacy
If privacy matters, running your own communication server is worth the effort. Start by getting a Linux server or an affordable VPS from providers such as DigitalOcean, Linode, or AWS; entry-level droplets often cost around five to ten dollars per month.
Both Rocket.Chat and Mattermost support Docker, which makes installation easier, install Docker, pull the app image, set environment variables, and launch the service. Many setups finish within an hour.
Rocket.Chat offers end-to-end encryption for stronger message privacy, while Mattermost encrypts data in transit and at rest. Pick Rocket.Chat when security is top priority and Mattermost when you want lighter resource use or easier integration. Rocket.Chat runs on MongoDB.
10. Install And Configure TeamSpeak For Voice Excellence
Setting up a voice server is similar across apps, download the server package, install it on Windows or Linux, and edit the configuration file or use the admin GUI to set the server name, authentication rules, audio limits and network port.
If you use Mumble instead, run Murmur, which ships with the Mumble installer. During setup, create a strong SuperUser password to stop unauthorized access. Enable both voice and text so players with poor mics or slow connections can still follow instructions.
TeamSpeak also lets each user adjust incoming volume for others so quiet speakers can be heard without changing anyone’s microphone. Join anonymous chat rooms with no registration at chat coffee. Design your room layout to match guild needs, a main lobby, officer room, raid rooms, squad rooms, and an AFK room.
11. Set Up Mumble For Gaming Communication
Mumble is a free, open-source voice app that gives clear audio with very little delay. People use it for podcasts, large game communities, and competitive play. The Murmur server runs on Windows and Linux and installs from a single Mumble package that includes both client and server.
Run the server setup, set a port and maximum users, then start the service. Mumble runs well on low-power hardware like a Raspberry Pi, so you do not need an expensive host. A small VPS or a home machine will work for most groups.
Turn on the in-game overlay to see who is in a channel or who is speaking. You can disable the overlay entirely or for specific games in Settings → Overlay. Encryption is on by default, control traffic uses TLS 256-bit AES-SHA and voice uses OCB-AES 128-bit.
12. Integrate Bots For Automation And Moderation
Bots add automation, moderation, and handy tools to your Discord or self-hosted chat. MEE6 and YAGPDB can handle moderation, welcome messages, role assignment and activity rewards.
They can mute spammers, remove bad content, warn rule-breakers, and assign roles based on activity. YAGPDB also offers a support ticket feature that creates a visible help role so members can request private help.
Dyno provides custom commands, announcements, auto-moderation, and music features. Create commands that answer common questions, post calendar reminders, or link to raid signups and guides. Game-specific bots like Raid-Helper, Sesh, and WoWAnalyzer help with event scheduling, RSVPs and raid logs.
13. Establish Communication Guidelines And Etiquette
Set clear rules to keep chat friendly and efficient. Write rules about acceptable content, respect, language, voice behavior and consequences for breaking rules. Put them in a channel new members must read and confirm before accessing the rest of the server.
Define voice etiquette for coordinated play. State when to use push-to-talk or voice activation, what background sounds are acceptable, if music is allowed and when people should avoid talking over leaders.
Mark channels for casual chat and others for focused gameplay. Use role mentions carefully. Save @everyone and @here for urgent messages only so people do not learn to ignore alerts. Targeted mentions like @Raiders or @Officers reach the right group. Set response expectations for applications and reports.
14. Back Up Your Server Configuration And Data
Losing chat history, role setups or bot settings is painful. Discord has limited backup tools, but server templates save channel layout, roles and permissions for quick rebuilding. Create templates before big changes.
Save important content manually, pin key messages, download images and documents, and keep copies of rules and guides in external storage such as Google Drive or Dropbox. If you self-host with Rocket.Chat or Mattermost, use Docker and back up volumes or run database dumps.
Schedule automated backups for databases and app files, keep copies locally and in cloud storage and test restores regularly so backups are actually useful. Back up bot settings separately. Some bots store data off-site, but custom commands and permission setups need documentation.
15. Monitor, Moderate And Maintain Your Server
Opening the server is only the start. Use verification tools like phone checks to block bots, but balance security with ease of access since some members may not want to provide numbers.
Watch server health with activity metrics. Spot quiet channels that should be archived, fix permission gaps, and catch issues before they grow. Many platforms show message counts, voice use, and member trends. Moderate fairly and consistently.
Ask members for feedback through polls and surveys so you can improve organization and tools. Adapt the layout as the group grows; channels that work for 20 people break with 200. Archive old content, split busy channels and update permissions when needed.
Essential Features Every Guild Chat Server Needs
Dedicated Channel Structure For Different Communication Types
Keep separate spaces for each type of conversation so members can find things fast. Text channels should have clear roles, announcements for major guild news only, general for casual talk, game-strategy for tactics, questions for help, and off-topic for non-game chat.
Label channels so people know where to post. Voice channels should match that order, a main hall for casual voice, raid channels for planned fights, squad channels for small groups, officer voice for leadership, and an AFK channel for idle users. Use automatic AFK moves to keep active channels tidy.
Role Based Access Control And Permissions
Use precise permissions to avoid security problems while giving trusted members the tools they need. Public channels are open to everyone for general chat, questions, and community building.
Avoid too many private channels since that can feel exclusive. Member-only channels should be for full members, not guests. Use them for private strategy, honest feedback, and internal planning.
Integration With External Tools And Platforms
Link your chat server with other platforms to keep things connected. Add Discord widgets to your website, sync accounts, and post announcements in both places to keep branding consistent.
Sync calendars so events appear everywhere. Tools like Raid-Helper or Sesh link to Google Calendar, send reminders, collect RSVPs, and alert members before events. Use game-specific tools for in-game data.
For example, add Warcraftlogs for combat analysis or zkillboard for kill tracking. Enable Rich Presence to show what members are playing. Create a gear-talk channel where members post build guides, share deals and discuss topics like cheapest 4k gaming setups.
Mobile Access For On-the-go Communication
Make sure members can stay involved from phones. Discord mobile supports most features, text, voice, role controls, and some admin tools. Officers can handle urgent issues on the go.
Self-hosted options also offer mobile apps. Rocket.Chat and Mattermost both have mobile clients with push notifications and many desktop features. TeamSpeak has a paid iOS client. Mumble works via third-party apps once set up. Pick platforms with strong mobile support if many members travel.
Security Features And Privacy Controls
Protect the server from outside attacks and internal problems. Require two-factor authentication for server owners and officer roles. Lock sensitive functions behind extra checks and audit elevated accounts often.
Keep security logs to spot odd behavior like strange logins, mass message deletions, or sudden role changes. Track IPs if needed to investigate abuse. Decide how to handle private message reports.
Make a clear process for reporting harassment that starts in direct messages and make sure officers know how to respond. Set content logging and retention rules. Some groups log everything for dispute resolution, others keep less data to protect privacy.
FAQs About Guild Chat Servers
Which Platform Is Best For A New Gaming Guild Just Starting Out?
Discord is the easiest choice for most new guilds. It is free, simple to set up, and many gamers already use it.
How Do I Prevent Spam And Trolls In My Guild Chat Server?
Use several layers of protection. Require email verification and consider optional phone checks.
Should I Use Discord Or Set Up A Self-hosted Server For My Guild?
Discord covers most needs and lets you focus on community. Choose a self-hosted platform only if you need full control over data, special features not available on Discord.
How Many Channels Should I Create For My Guild Server?
New guilds often do well with about eight to twelve channels like rules, announcements, general chat, strategy, voice rooms and an officer space.
What Permissions Should Officers Have Versus Regular Guild Members?
Officers need powers to keep the server running, manage messages, kick or ban users, create and edit channels, set roles and manage integrations.
How Much Does It Really Cost To Build A Chatbot?
A typical chatbot project can cost between $40,000 and $150,000. The final price depends on how complex the bot is and which features you want.
Final Thoughts
A good chat server turns scattered chats into a smooth hub for raids, strategy and daily hangouts. Start small, lock down the basics and add features only when the group needs them.
Keep rules clear, back up important data and ask members for feedback as you grow. Do that and your guild will spend less time managing tools and more time playing together.
Also Check Out: The Role Of Games In Developing Problem-solving Skills